Showing posts with label felting. Show all posts

Friday, February 20, 2015

Nuno Felt workshop April 11, 2015

It's time for another beginners nuno felting scarf workshop! It will take place on April 11th in Grants Pass and is a wonderful workshop to take if you have every wanted to give nuno felting a try or need a refresher. In this class we will cover the basics of how and why wool felts, how it migrates into fabric, surface design and embellishment, how to incorporate non-wool items, fulling (the shrinking that creates texture) finishing and how to care for your unique creation. 

The technique learned in this class will be the foundation required for moving on to more advanced felting projects. We will be using our upper body a lot during the felting process so stamina and good upper body health is required. Here are some examples of the kind of scarf we will be making. Details for the workshop are below.


What: Nuno Felt Scarf Workshop
When: Saturday, April 11, 2015
Time: From 10:00 a.m. to 4:00 p.m.
Where: Unitarian Universalist Church, 525 NE 6th St., Grants Pass
Cost: $75.00 - all materials included
Instructor: Rhonda Lynn

A full kitchen is available on site - bring your lunch and snacks. Please bring one or two old towels and fabric scissors. Wear comfortable shoes and clothes that you don't mind getting a little wet.
Sometimes the runoff water has a very slight amount of dye in it and there is no guarantee it won't stain your favorite jeans or sweater! If you have any questions send me an email to inspiredfelt@gmail.com or call 541-291-2291.


Student's first & last name

Saturday, February 15, 2014

Drop-in felting workshop for All Ages!

Come to the Williams Barter Faire and World Market this Saturday the 22nd for live music, local arts and a felt making drop-in workshop for all ages. Instruction to make a felt flower for $25 and a headband for $30. Support your local artisans!! See you there!


Tuesday, January 14, 2014

Next Nuno Felt Scarf Workshop Feb 11th

Due to popular demand I have scheduled another beginners nuno felting scarf workshop in Grants Pass. It will take place on February 11th and is a wonderful workshop to take if you have every wanted to give felting a try. In this class we will cover the basics of how and why wool felts, how it migrates into fabric and we work through the entire felting process. 

The technique learned in this class will be the foundation required for moving on to more advanced felting projects. We will be using our upper body a lot during the felting process so some stamina and good upper body health is required. Here are some examples of the kind of scarf we will be making. Details for the workshop are below.


What: Nuno Felt Scarf Workshop
When: Tuesday, February 11, 2014
Time: From 10:00 a.m. to 4:00 p.m.
Where: Grants Pass Center for Spiritual Living 466 S.W. I St., Grants Pass
Cost: $75.00 - all materials included
Instructor: Rhonda Lynn

A full kitchen is available on site - bring your lunch and snacks - filtered water will be provided. Please bring one or two old towels and fabric scissors. Wear comfortable yet old clothing and shoes that can get wet.
Sometimes the runoff water has a very slight amount of dye in it and there is no guarantee it won't stain your favorite jeans or sweater! If you have any questions send me an email to inspiredfelt@gmail.com or call 541-291-2291


Workshop $75 - Enter full name

Fun Nuno Felt Workshop!

On the 10th of the month I gathered with some beautiful ladies and taught them the skills to create nuno felt. With some information and demonstration they proceeded to lay the fibers and work them into a one of a kind piece of wearable art. Here are some photos from that workshop. Each participant finished at a different time so, silly me, I didn't get images of their completed scarves - duh! Next time...


My favorite student!!!!

Thank you to the lovely ladies that brought such great energy and fun to the scarf workshop in Grants Pass. I enjoyed you so much and just love the wonderful scarves you created!

If you are intrigued by the images or the process and would like to take a class let me know. The next class will be February 11th in Grants Pass followed by a workshop with the choice of making a flower or a headband. Come and learn the ancient, earth friendly and amazing fine craft that is felting!

Tuesday, November 26, 2013

Nuno Felt Scarf Workshop January 10th

Hello lovelies. Are you ready to learn how to nuno felt? So many of you have asked for a class and the time has come. I have space for 8 of you, first come first serve. I will be notifying about 40 people that have requested a class, so if its something you really want to do I suggest you sign up right away. This class would make a wonderful Christmas present for yourself or a loved one. (Or add it to your Christmas wishlist!)

In this class we will cover the basics of how and why wool felts, how it migrates into fabric and we work through the entire felting process. The technique learned in this class will be the foundation required for moving on to more advanced felting projects. We will be using our upper body a lot during the felting process so some stamina and good upper body health is required. Here are some examples of the kind of scarf we will be making. Details for the workshop are below & please note that preregistration is required. 


What: Nuno Felt Scarf Workshop
When: Friday, January 10, 2014
Time: From 10:00 a.m. to 4:00 p.m.
Where: Grants Pass Center for Spiritual Living 466 S.W. I St., Grants Pass
Cost: $60 + $15 materials fee
Instructor: Rhonda Lynn 


A full kitchen is available on site - bring your lunch and snacks - filtered water will be provided. Please bring a few old towels and scissors. Wear comfortable shoes and clothes that can get wet. We will be working with a lot of soapy water and you will get wet. If you have any questions send me an email to inspiredfelt@gmail.com or call 541-291-2291.


Workshop $60 + $15 materials

Sunday, October 6, 2013

Great New Vests!

I recently made a couple of seamless nuno felted vests out of recycled and repurposed fabric. One is made from a repurposed cotton sarong using super fine merino wool and embellished with novelty yarn. I made it for Felt United Day inspired by the theme of water. The sarong is dyed with lovely blues and greens and at the bottom it said Bora Bora. The novelty yarn dressed it up wonderfully and reminds me of the kelp beds that sit just where the waves roll. The vest is revisible, seamless and completed with no sewing at all!


The other vest was made with a recycled piece of lavender nylon fabric I found at a thrift store. It is embellished with some shiny, iridescent dots. On the side with no dots I added 2 different purple wool yarns and a deep purple and shiny novelty eyelash yarn. It is stunning and I love it soooo much! This one is also reversible, completed without sewing, but also has a nice thick collar.


Thursday, October 3, 2013

The Deep Sigh of Fall

Ahhhh, I love fall! Gaia, mother earth is relaxing and when I quiet my mind I can hear her deep sigh. The heat of summer has moved out and the air is crisp and clean. I feel renewed, rejuvenated and ready to really connect with nature.

As the temperature drops it's time for headbands, hats and jackets! Headbands are so versatile because they can also be used as ear warmers and neck warmers. If you're not a hat person a headband can be your best friend this time of year. Below are photos of a new batch that are available at Saturday Market right now! Holiday art and craft shows are gearing up and I will be at Artoberfest in Kerby, Pacifica Art's Guild Holiday Bazaar in Williams, Friend of the Library Holiday Bazaar in Grants Pass and North Valley High School Arts & Crafts show. Hope to see you at one or more!

Wide headband - great for dreads or thick hair!
Frilly Lace
Assortment of vintage lace
Silk & wool in burgundy fall tones

Thursday, April 4, 2013

Illuminated Felt; Done & off to Nancy!


I finally finished my part of the collaborative piece I am working on with Nancy Skakel of Washington. I think it looks fabulous all lit up. Now it is on it's way to the remarkable hands of Nancy to be transformed. I have to say, she is so wonderful with detail and is an embellisher extraordinaire! I can't wait to see what she does with it - very exciting! Below are some photos of the layout of side two and how it looks lit up. 

Dry layout - side 2
 
Wet down to see how it looks
 
Re-do of the tree on side 1 - I like it much better now!


Side 1 lit up
 
Side 2 lit up

Sunday, March 17, 2013

Collaborative Illuminated Felt Fiber Art

I met an amazing fiber artist, Nancy Ruth, through an on-line felters e-mail group and we started talking about the different festivals and events we attend. She lives fairly close to me and we were discussing the nearby Black Sheep Festival that takes place in Eugene. Nancy has been wanting to work on a collaborative piece and enter it in this event.

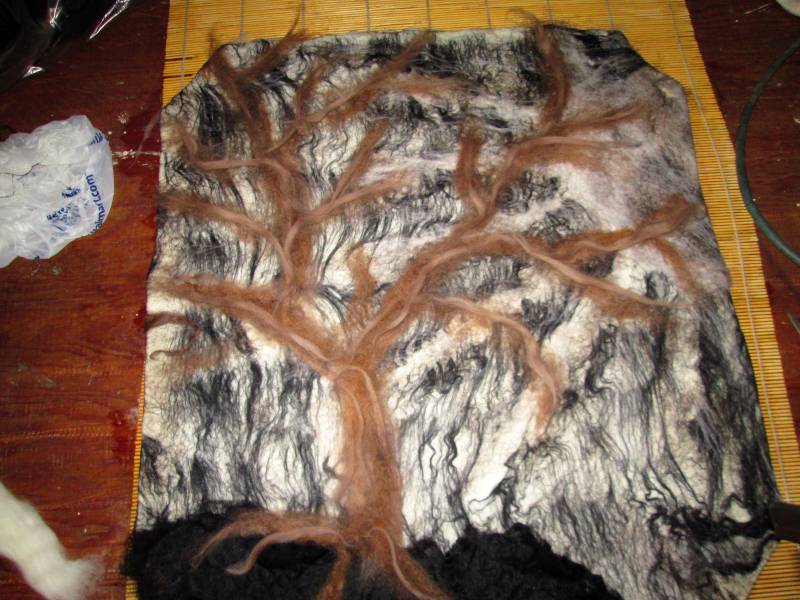
We decided to work together on something. We each will start a piece then swap with each other and finish them. Our chosen theme is Inner Light. I am working on a seamless piece that will be a lampshade of sorts. Depending on how it finishes us it might be suspended with a bulb inside, or as a stand alone piece with a bulb. either way, it will be lit from within.

Tree still needs some work, but you get the idea
This is the first side with the moon, moonlight rays and a tree. More details and fine tuning will occur. I have a resist underneath and will turn it over and work the other side with a continuation of the moon and moonlight rays. Below you can get an idea of how it looks with light shining from behind. Once it is finished and a bulb is shining it will have a bit of yellowish tint from the incandescent bulb.

Seeing how it looks with light from behind

Friday, March 15, 2013

Nuno Felted Book Cover - Part 2

Where we left off: Felted, fulled, dry & somewhat misshapen

Looks like I am getting this post done this week by the skin of my teeth. But I made it, whew!!! If you are just now joining this pictorial lesson, be sure to read Part 1 first, and then follow along with part 2. Thanks for your patience everyone. And now, on with the show...

 When we left off last time the book covers had been felted, fulled, rinsed and left to dry. Now we get to cut the flaps that will hold the front and back covers. I start by laying the book on the felt piece to make sure it's still large enough. If you find yours has shrunk too much you can wet it again, stretch it, block it and then let it dry.

Checking the size

Now I make a cut on either side of the center hole, straight up and down. The wider it is, the more of the book cover will fit inside. Since the center hole of this one is rather large so all I really needed to do was cut so it straightened the edges of the pockets. I then cut all the way to the top edge and it leaves the extra material on the top and bottom to be removed.

Sides cut straight and extra material at the top & bottom


I cut straight across the top and bottom to remove the excess felt.

Extra felt cut off the top.

Pockets formed & raised up so they are easier to see

The book will be placed inside this area

 Repeat the process with the other book cover if you made two like I did.

Book cover before cutting
 
Pockets being cut with excess felt at the top
Excess felt at top and bottom with pockets cut straight

Excess felt removed


Now that the pockets have been formed and the excess felt has been removed we need to seal the edges of the fresh cuts.

Freshly cut edges need to be sealed


Head back to the sink and thoroughly wet the felt. Put a drop of soap on your finger and then rub the raw cut to seal it.

Rubbing the edges
  Work all the way around and seal all cut edges.

Keep rubbing all cut edges

After some time rubbing your edges may become uneven or a bit fuzzy. Carefully trim if necessary and then rub lightly to seal.

Uneven & fuzzy edge after sealing
Sometimes it helps to rub back and forth against the counter top to keep the edges from getting uneven.
Rubbing the edges against the counter

Once you have finished with all the cut edges, it's time to rinse again. No kneading or throwing this time, just gently rinsing.
Gently rinse the soap out

I like to make sure it has kept the proper shape so I cover the book in plastic and do a fitting on the book.
Book wrapped in plastic for a fitting

Close the cover to make sure it's fitting properly

Looking good!

Once you know it fits correctly remove it from the book and let it dry. In the meantime, pick out a pretty button and gather your needle and thread. When it's dry put it on the book, close the flap and decide where you want the button to be.

Here?
Or maybe here?

Ah yes, right here!

To make the button hole, cut the tiniest of slits in your chosen location. Wet your fingers - no soap this time - and rub the cut. The edges will seal and the hole will slowly get larger. Check it periodically against the button to make sure you don't make it too large.

Snip a tiny slit to start the button hole
 
It gets larger after rubbing it with wet fingers
 
Check the size using the button - don't make the hole too big

 After you have gotten the button hole to the correct size, mark the location on the body of the cover where the button will be and stitch it in place with a strong thread.
Marking location of button
 
 Guess what? That's it. You are done!! How does it feel? Examine your handiwork and congratulate yourself on a job well done. These two are off to their new homes and will be treasured for many years to come. If you make any please share the photos with me - I would love to see your work. I hope to do a nuno felted poncho or jacket soon and will get that posted here as well. It may be a while but it will get done. In the meantime I will be getting inventory made for the upcoming Spring Arts Festival next week and the Master Gardener Spring Fair next month - with our Artisan Market selling season beginning the following month. Wow, Spring has sprung!

Merino roving, silk fabric, firestar
Merino roving, merino tussah blend, cotton gauze, poly lace