This is an art piece I am doing for a friend of mine. It is created using the technique of nuno felting using a base of sparkly gold tulle covered with merino wool, corriedale wool, silk sari yarn and copious amounts of firestar and angelina. At this stage it is all laid out and wet down. The next steps will be rubbing, rolling, tossing, throwing and shaping. I will post some pics of the completed piece soon.
My friend is an art therapist and works with people using art as a tool for opening up and going within to release old injuries and patterns of behavior. In one session with her she helped me to reconnect with parts of myself that I had shoved away and ignored at several intervals throughout my life. The three smaller figures represent my child self of about 4yrs old, my teenage self of about 16, and my young adult self of about 30. The large central figure is me now.
At each stage of my life, those parts of me had hopes, dreams and desires that not only went unrealized, they were shoved away. I let other things dictate the course of my life and didn't see those parts of myself as important enough to nurture. In the therapy I was able to reconnect with those parts of me, since they still exist. What a wonderful and empowering exercise! I now feel whole and complete. I recognize those old dreams and desires and now know their importance in the progression of my life. I have rediscovered how valuable I and my hearts desires really are. Thank you Karen! You have a wonderful gift and I am privileged to have experience it!
The home of the co-created felting adventures of two best friends, Rhonda Lynn and Epiphany Fibersong. Follow along as we show, share and teach our love of all things felt and how, by incorporating recycled and re-purposed materials we create stunning pieces that are environmentally friendly, functional and pure magic! Each creation is an extension of what nature has already given us and it is our passion inspire others with our co-creative expressions.
Monday, February 11, 2013
Heart Strings
Labels:
art,
art therapy,
connection,
correidale,
felt,
felted,
felting,
fiber art,
heart,
heart strings,
hearts,
meditation,
merino,
nuno,
silk,
therapy
Tuesday, February 5, 2013
Fingerless Gloves :D
I found a distressed dress, destined for the trash, made of a sheer fabric with embroidered vines and flowers. It has beautiful iridescent pink and yellow sequins that sparkled at me. I knew that I needed to save it and repurpose it into something functional yet still beautiful. The result is this pair of cozy fingerless mitts.
These fingerless gloves were made with merino wool and I added the fabric using the technique of Nuno felting. With the use of soap, water, and lots of pressure and friction the salvaged fabric and wool join together become an entirely new fabric. These were also created around a resist so they are seamless.
Sunday, February 3, 2013
Can luxurious fashion be good for the planet? Yes!
I made this vest last summer & this gal is
modeling it at the Fiber Mania fashion show. I used some poly lace
destined for the landfill and sustainable merino wool. Isn't it awesome
that fashion and art can be good for the planet! Luxury with a
conscience is what it's about baby!
20% off for followers of my blog! Just use coupon code HellaGood at checkout. Find the listing in my Etsy shop.
Friday, February 1, 2013
Inspiration - where are you??
I am having a bad case of felter's block! In an effort to find inspiration I did what has worked in the past; walking in nature, playing with my dogs and chickens, scrolling the blogs and websites of my favorite fiber artists. All wonderfully fun things to do, but still not inspired. Nope. Not even a little bit. What to do?
OK, so I am seeking inspiration and the regular inspiring things failed. Ah ha! Type "seeking inspiration" in Google and see what happens. Tada - "A 2 Minute Opening to Inspiration and Guidance"! It sounds like exactly what I need. Enter the website Lightspirited Being. I have to say, just looking at their beautiful site banner inspired me. A close up of brilliantly colored butterfly wings. Ahhhhhh.
It starts out this way...
I crave it already! I will sit in a quiet place, go to that place that opens and accepts inspiration and then go to bed. With my notebook handy in case I get any brilliant ideas in my dreams - off to sleep I go. If this works then I should have a new post up in a day or two with another fun and fabulous piece of art! Let me know if this works for you or if you try it at all.
Good night and sweet dreams!
Labels:
chakra,
design,
felt,
felting,
fiber,
fiber art,
indie,
inspiration,
meditation,
opening,
receive,
seeking
Saturday, January 26, 2013
Some of my crochet hat styles
Here are photos of some of my crochet hat styles. Most , but not all, of these are sold but I like to keep photos of past projects. Click on any of the 3 layouts below to open a larger image. Which are your favorites?
![]() |
| Layout 1 |
![]() | |
| Layout 2 |
![]() | |
| Layout 3 |
Thursday, January 24, 2013
Eco-Friendly Abundance in my Studio
I live in a 1.5 bedroom house. The .5 bedroom is for storage so that leaves only the kitchen, which is fairly large, for studio space. Actually it is an open area that would be kitchen & dining area. I have taken over the dining area.
I prefer to use recycled fabrics and embellishments in my designs for two reasons. Cost is one, but the other is I'd rather keep the old stuff out of the landfills AND unless you are buying Peace Silk, the process of harvesting silk is quite brutal. I am amazed at the amount of natural fabrics I find at yard sales and thrift stores. Beautiful rayon, cotton, silk and linen are very abundant. By scrounging materials in this way I can keep my costs down and pass the savings on to my customers. It does however, tend to create a cluttered studio.
My solution is this great storage space. I am attempting to keep the materials somewhat color coordinated but already need another row of squares! I am working towards a studio space separate from the house. How do my hip boots wind up on my felting table?? Well, it is in the center of house activities. A studio, a real, separate, private studio. It's on it's way - that much I am sure of. In the meantime, I will put the hip boots away, install another row of storage space, smile at my abundance and hit another thrift store. Wheeeee!
I prefer to use recycled fabrics and embellishments in my designs for two reasons. Cost is one, but the other is I'd rather keep the old stuff out of the landfills AND unless you are buying Peace Silk, the process of harvesting silk is quite brutal. I am amazed at the amount of natural fabrics I find at yard sales and thrift stores. Beautiful rayon, cotton, silk and linen are very abundant. By scrounging materials in this way I can keep my costs down and pass the savings on to my customers. It does however, tend to create a cluttered studio.
My solution is this great storage space. I am attempting to keep the materials somewhat color coordinated but already need another row of squares! I am working towards a studio space separate from the house. How do my hip boots wind up on my felting table?? Well, it is in the center of house activities. A studio, a real, separate, private studio. It's on it's way - that much I am sure of. In the meantime, I will put the hip boots away, install another row of storage space, smile at my abundance and hit another thrift store. Wheeeee!
Sunday, January 20, 2013
TADA! Hand Sculpted Felt Cloche Complete
Here it is - the moment you have all been waiting for! The completed hat. It is being delivered today and I hope the recipient is thrilled with it.
What do you think? Was it fun or interesting to see a glimpse of the process? I really enjoyed documenting it for you and hope to add more posts of the creative process. Please share your thoughts with me. I am posting these not only for myself but to share in the fun and magic of the process that is Felting.
Saturday, January 19, 2013
Hand Sculpted Felt Cloche - the rest of the story...
| Trimming the flat felt I made yesterday - too stinking thin - ugh! |
| Adding 1 more layer to yesterdays felt and 4 layers to the outside. |
Rubbing vertically on the folds.
And rubbing some more
Rubbing with my knuckles
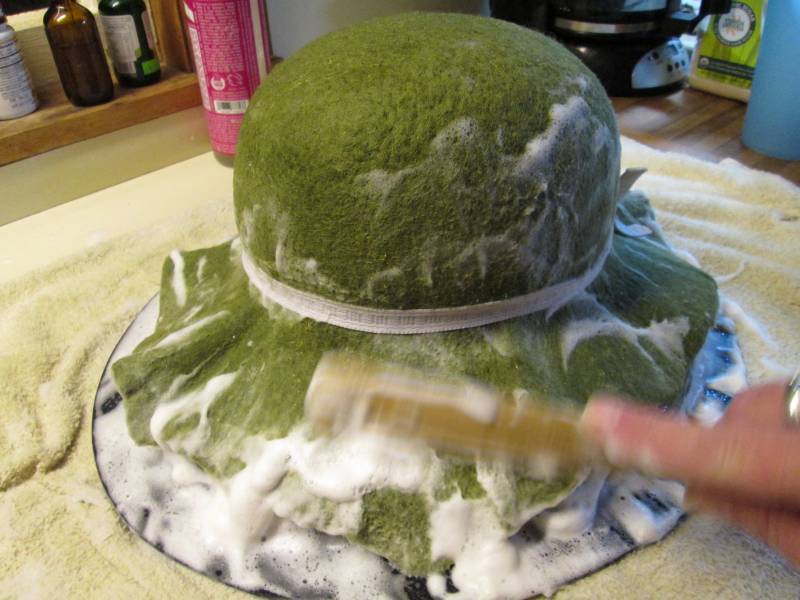
Now it may be hard to believe, but a piece of flat felt can be sculpted to the shape of a hat form - with enough rubbing. It's amazing to watch it take place under your hands. So, now that the folds are all gone and it's got a snug fit to the form it's time to trim and work the brim. After giving it a rough trim I secure the crown with an elastic band and then set to work on the brim. I am rubbing it with the handle of a wooden spoon to save the skin on my hands. For as soft as it is, it is quite exfoliating. That's why felted soaps are so great in the shower!
| All smooth and ready to trim |
| Rough trim, elastic to hold it in place and rubbing with a wooden spoon handle. |
| Sealing the trimmed edges |
| Rinsing - this takes a while too! |
| Drying by the wood stove |
| Completed flower & lace hat band |
I added some red lace to the flower but I'm not sure if I really like it. I'll include it anyway but let her know if she doesn't like it I'll make her another one. I really do like the lace hat band though. So pretty!
Come back tomorrow when I take the hat off the form, add the flower and hat band and present to you the finished product all together and beautiful! I am happy to answer any questions you may have and really do appreciate your comments. :D

Can you help? and Hand Sculpted Felt Cloche continues
Can you help? I have created an on-line portfolio in the hopes of winning an arts grant. The more supporters I have, the greater my chances. If you can spare a minute to go to my portfolio here, rhondarogalski.see.me, and click Support in the upper right, it will help greatly. There is nothing to sign up for, but it will ask you to post a link on your page of my portfolio. I would appreciate it so much if you could help spread the word about the work I am doing. The more people that are aware of the sustainability and environmentally friendly process of felting, the more our artists will succeed as well as bringing new artists on board.
Stay tuned for more of the exciting adventure of creating a hand sculpted Felt Cloche. The journey completes today with more photos of the process and the completed hat. Thanks for coming along!
Friday, January 18, 2013
Hand Felted Cloche Begins
Today I started making the cloche that was a custom order. I took some photos along the way to show some of the steps. It's not a complete tutorial but if you are already familiar with felting then you will get the idea. If you have no felting experience or would like to use a really nice, step by step tutorial, HandiCraftKate offered one on Craftsy. You can get in touch with her to see if its still available. It is awesome!! So, here goes...
I began yesterday by choosing my materials and today I started by laying out the roving to make the flat felt that will eventually be sculpted into a cloche, or wide brimmed hat. I laid out 3 layers and then decided it needed a bit of sparkle. The woman who ordered this is an entertainer with very red hair, so I don't think she is going for subtle. Since the fabric I will be using for the flower has gold threads in it I decided to sprinkle some gold Firestar on the roving.
After it was all laid out I covered it with some netting and rubbed until it passed the pinch test. Then I went to work with the sander. I love using the sander!!!!
After both sides were sanded it was off to the sink for squeezing, kneading & rinsing in the sink, throwing, then repeat all several times.
I wanted to harden the flat felt a bit more so I threw it in the dryer with a bunch of felted dryer balls for about 15 min. While it was tumbling I began laying the roving on the recycled lace to make the removable hat band.
Now to make the flower. I cut out 2 circles from the shirt and one I cut into petal shapes. I laid some roving, Firestar and kid mohair locks then sanded it together. The other circle has roving laid onto the back only. These aren't the best photos but it will be Fab when you see it all together tomorrow!
All the pieces I made today are drying and resting, getting ready for tomorrow. I will begin by sculpting the cloche which takes quite a while. It will require a lot of rubbing and shaping with my hands. Stay tuned & I'll post the photos when it's all done. Thanks for tagging along as I make and create with Fab fibers :D
I began yesterday by choosing my materials and today I started by laying out the roving to make the flat felt that will eventually be sculpted into a cloche, or wide brimmed hat. I laid out 3 layers and then decided it needed a bit of sparkle. The woman who ordered this is an entertainer with very red hair, so I don't think she is going for subtle. Since the fabric I will be using for the flower has gold threads in it I decided to sprinkle some gold Firestar on the roving.
| Shingling the merino roving |
| Firestar sprinkled on top |
After it was all laid out I covered it with some netting and rubbed until it passed the pinch test. Then I went to work with the sander. I love using the sander!!!!
| Rubbing on the netting with a recycled grocery bag |
| I love my sander <3 |
| Rinsing, squeezing & kneading |
| Throwing - this part can be a lot of fun!!! |
| 2 layers of roving on the back |
| Rolling the cord that will be the ties |
Now to make the flower. I cut out 2 circles from the shirt and one I cut into petal shapes. I laid some roving, Firestar and kid mohair locks then sanded it together. The other circle has roving laid onto the back only. These aren't the best photos but it will be Fab when you see it all together tomorrow!
| Fabric with merino roving, Firestar and kid mohair locks. |
| The 2 pieces of fabric together. It will look better tomorrow! |
Subscribe to:
Posts (Atom)