I was very excited to get busy completing the cloche today, but couldn't get to it until 3:30 this afternoon. Whew, am I tired! To start off, I decided that my flat felt from yesterday was too thin. I decided to trim it a bit bigger than the form and then add another layer to it, while adding 4 layers to the outside so it would be consistently thicker. There's a lot to be said for doing a test swatch and measuring the wool. Next time... maybe.
 |
| Trimming the flat felt I made yesterday - too stinking thin - ugh! |
 |
| Adding 1 more layer to yesterdays felt and 4 layers to the outside. |
I then had to repeat the wetting, rubbing, sanding, rinsing, kneading and throwing from yesterday. Once that was all done, the new and thicker piece of flat felt was centered on the hat block. I squirted it with soap, poured on some hot water, and started rubbing. And rubbing. And more rubbing. Whew - it takes quite a while...
Rubbing vertically on the folds.
And rubbing some more
Rubbing with my knuckles
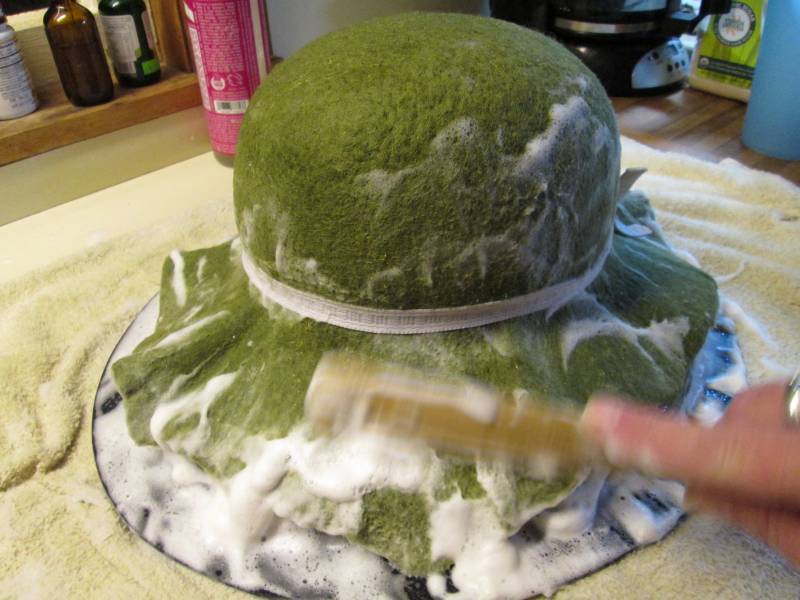
Now it may be hard to believe, but a piece of flat felt can be sculpted to the shape of a hat form - with enough rubbing. It's amazing to watch it take place under your hands. So, now that the folds are all gone and it's got a snug fit to the form it's time to trim and work the brim. After giving it a rough trim I secure the crown with an elastic band and then set to work on the brim. I am rubbing it with the handle of a wooden spoon to save the skin on my hands. For as soft as it is, it is quite exfoliating. That's why felted soaps are so great in the shower!
 |
| All smooth and ready to trim |
 |
| Rough trim, elastic to hold it in place and rubbing with a wooden spoon handle. | |
|
Once the brim is nice and smooth I did a final trim on the brim and then rubbed the cut edges to seal them. Holy cow - it's done! Into the sink for a rinse then to sit by the wood stove to dry overnight. Man, I'm tired, but that was Awesome!!!!
 |
| Sealing the trimmed edges |
 |
| Rinsing - this takes a while too! |
 |
| Drying by the wood stove |
 |
| Completed flower & lace hat band |
I added some red lace to the flower but I'm not sure if I really like it. I'll include it anyway but let her know if she doesn't like it I'll make her another one. I really do like the lace hat band though. So pretty!
Come back tomorrow when I take the hat off the form, add the flower and hat band and present to you the finished product all together and beautiful! I am happy to answer any questions you may have and really do appreciate your comments. :D


What a lovely project. I love it! Thankyou for illustrating it so well.
ReplyDeleteHappy felting
Joan
Thank you Joan, I'm glad you enjoyed it. I've been meaning to take photos of the process for quite some time but I always forget until I'm at least half way through :0 I guess I just get so involved! I will be adding more so stay tuned...
ReplyDelete